
Chemical substances are identified within the OECD (Q)SAR Application Toolbox via their atom connectivity usually determined also as their two dimensional (2D) structure. Connectivity could be coded trough different identifiers based on a set of rules that transform "connection table" into a sequence of characters. Although the chemical could be entered in the system by its name, CAS registry number, via drawing its 2D structure, etc., the system will identify the corresponding atom connectivity and most of the next activities including search for analogues, prediction of activity, etc, will be based on this connectivity. Use of atom connectivity as a unique chemical identifier may cause some inconvenience.
For example, chemical substances with different CAS registry numbers may have the same atom connectivity due to their sub-molecular state or even because of historical reasons. In cases of an ambiguous interpretation of chemical identity the system will handle chemicals as different targets and the user will be able to delete some of them from the data matrix.
In the "Input" module, the user defines the identity of the target chemical on which to apply the functionalities of the Toolbox. There are two options here:
o Loading a single chemical
o Loading a list of chemicals
I. Single chemical
A single chemical could be entered in the system by:
o chemical name (wild cards are allowed)
o 2D structure (entering its SMILES or drawing the structure manually)
o selection from an existing database
o selection from an existing inventory
o selection from a custom file
The selected chemical is then added to the data matrix and the user can proceed to the next stage of the workflow. (Figure 1)

Figure 3
Opening the node Substance Identity, then the chemical identity is displayed on data matrix.
A colour code indicates the reliability of the chemical identifier:
|
Green |
There is a high reliability between the identifier and the structure. This colour is attributed if the identifier is the same in several quality assured databases |
|
Yellow |
There is only a moderate reliability between the identifier and the structure. The colour is attributed if the identifier is the same in several databases for which the quality assurance could not be established |
|
Red |
There is a poor reliability between the identifier and the structure. The colour is attributed if the identifier is allocated to different structures in different databases |
|
Blue |
There is a conflict between relations |
Double click over the cell with Chemical name to see the source databases. (Figure 2)

Figure 2
Double click over the cell with CAS/2D relation (Figure 3)

Figure 3
The “A” means that the SMILES notation is assigned for the current CAS number (e.g the SMILES is assigned for the CAS number in the Aquatic US-EPA ECOTOX database)
1. Entering by CAS
1.1. Single structure (discrete, mixtures)
To enter a chemical by its CAS (Chemical Abstract Service) number the user can simply press the button CAS # (1), enter the CAS number of the chemical without hyphens (2), press the button Search (3) and once the correct structure appears, press button OK (4). (Figure 4)

Figure 4
In case a structure has several CAS numbers or a structure could be related to more than one substance, more than one chemical identity could be retrieved. In this case the user has to decide which substance to be retained for the subsequent workflow.
1.2. Set of tautomeric structures
To enter a set of single target structures for example tautomer forms of a chemical, the user can simply press the button CAS # (1), enter the CAS number of the chemical without hyphens (2), then check the tautomeric set checkbox (3), press the button Search (4) and once the correct sets of structure appears, press button OK (5). (Figure 5)

Figure 5
In case there are tautomeric set with same CAS numbers in the databases, then more than one set of chemicals identity could be retrieved. In this case the user can decide which tautomeric set to be retained for the subsequent workflow.
2. Entering by Name
To enter a chemical via its name the user has to select the button Chemical Name (1), write the name of the target chemical (or part of it) in the field Search for name (2), and select one of the search options: Exact match; Starting with; Containing (3) and press the button Search (4). (Figure 6)

Figure 6
A list of chemical names ordered alphabetically will appear; each name is accompanied by its 2D structure and QA relations. The user has to select the appropriate chemical from the list of names by clicking over the row with the desired chemical (5) or using the buttons: Select all; Unselect all; Invert selection (6) and then press the button OK (7). (Figure 7)

Figure 7
This mode allows entering of chemical identity using "wild cards" search. A maximum of 192 characters is allowed to be used in the field Search for Name (2). (Figure 7)
3. Entering a chemical by structure
3.1. Single structure (discrete chemical)
Atom connectivity could be defined by drawing of chemical 2D structure. The user has to select the button Structure (1) and then to draw by hand the structure of the target chemical in the Structure Drawing window (3). The corresponding SMILES will be automatically generated with the progress of the drawing. A complete drawing must be confirmed via the button OK (4). (Figure 8)

Figure 8
Another way of entering the connectivity is by chemical's SMILES (Simplified Molecular Input Line Entry System) or InChi (IUPAC International Chemical Identifier) code. The user needs to enter (write or paste) the corresponding code in the field SMILES/InChi (2). (Figure 9) If the atom connectivity is coded correctly, the corresponding 2D structure, CAS registry number and chemical name will appear.

Figure 9
In case of incorrect entry code, the field SMILES/InChi (2) will be colored in red and the structure is not displayed. Short explanation text appears in the filed under the Template panel (3). (Figure 10)

Figure 10
After the drawing the system will search the databases and inventories for the entered SMILES. The identified SMILES code(s) appears, then the user has to select the appropriate chemical in case of more than one SMILES is identified. Finally click OK (1). (Figure 11)

Figure 11
3.2. Set of structures (mixture)
The SMILES notation of each compound of the mixture is drawn as described in the “Single structure (discrete chemical)” section. In order to draw the SMILES notation of the mixture, the user has to separate the SMILES of the compounds with the “underscore” symbol (1). (Figure 12)

Figure 12
The quantities of the components of the mixture could be added using the button (2): (Figure 13)

Figure 13
Add the quantity of the components using cell with numbers (3) (Figure 14)

Figure 14
3.3. Set of tautomeric structures
To add set of tautomeric structure of a target by drawing, the user should draw the SMILES of the target chemical as described in the “Single structure (discrete chemical)” section. After the target chemical is found by the system, the user has to check the Tautomeric set checkbox (1). The system will search tautomeric set with required SMILES. (Figure 15)

Figure 15
3.4. 2D Editor details
Main Menu Bar
The Main Menu Bar is located at the top of Drawing Module (Figure 16):

Figure 16 Main Menu Bar
When the mouse pointer is placed on most of the symbols & buttons on the Main Menu Bar, a very brief description of that symbol or button's use is shown. Descriptions and applications of the symbols & buttons (from left-to-right) are as follows:
 These are the Undo Button (left arrow, or Ctrl+Z key combo) and ReDo
Button (right arrow, or Shift+Ctrl+Z key combo) ... the Undo Button
removes the previous change to the structure in the Drawing Area ... the ReDo
Button re-instates an Undo.
These are the Undo Button (left arrow, or Ctrl+Z key combo) and ReDo
Button (right arrow, or Shift+Ctrl+Z key combo) ... the Undo Button
removes the previous change to the structure in the Drawing Area ... the ReDo
Button re-instates an Undo.
 Clear Canvas Button (also Ctrl+E key combo)
... Clears (or Erases) everything in the Drawing Area ... Warning - Once
the Drawing Area is Cleared, the ReDo Button will not bring it back.
Clear Canvas Button (also Ctrl+E key combo)
... Clears (or Erases) everything in the Drawing Area ... Warning - Once
the Drawing Area is Cleared, the ReDo Button will not bring it back.
 These are the Atom Label Buttons ... These buttons are clicked
to Show/Hide Heavy Atoms (the "C" button) or Hydrogen Atoms (the
"H' button) ... Both buttons can remain in either a "pressed"
state (as depicted) or in an "not-pressed" state (default is both
buttons pressed) ... These buttons add or remove labeling of atoms show in the
Drawing Area ... These buttons can help depiction depending on the complexity
of the structure ... Example depiction of phenol are:
These are the Atom Label Buttons ... These buttons are clicked
to Show/Hide Heavy Atoms (the "C" button) or Hydrogen Atoms (the
"H' button) ... Both buttons can remain in either a "pressed"
state (as depicted) or in an "not-pressed" state (default is both
buttons pressed) ... These buttons add or remove labeling of atoms show in the
Drawing Area ... These buttons can help depiction depending on the complexity
of the structure ... Example depiction of phenol are:

 Atom Number Button - Click to
Show/Hide Atom Numbers (default is Hide) ... The atoms are numbered in the
order they were drawn ... Example of phenol showing
Atom Numbers:
Atom Number Button - Click to
Show/Hide Atom Numbers (default is Hide) ... The atoms are numbered in the
order they were drawn ... Example of phenol showing
Atom Numbers:

 Flip Button (also Ctrl-T key
combo) - Flips the structure vertically
Flip Button (also Ctrl-T key
combo) - Flips the structure vertically
 Depiction Mode Button - used to switch
between Implicit and Explicit representation (default is Implicit) ... Explicit
example for phenol:
Depiction Mode Button - used to switch
between Implicit and Explicit representation (default is Implicit) ... Explicit
example for phenol:

 Font
Button -
changes font on the Structure
Font
Button -
changes font on the Structure
 Bond Selection Button and Drop-Down
Menu - Depressing the Bond Button allows drawing bonds in the Drawing
Area (bonds drawn will correspond to the selection shown from the
drop-down menu).
Bond Selection Button and Drop-Down
Menu - Depressing the Bond Button allows drawing bonds in the Drawing
Area (bonds drawn will correspond to the selection shown from the
drop-down menu).
 When the Atom Tool Button is depressed, the mouse
pointer adds the word "atom" to the pointer when the pointer is
located within the Drawing Area ... The selected atom is shown in the small
entry box next to the button ... To change the atom in the entry box, click in
the entry box and enter the atom desired (or use the Periodic Table Button).
When the Atom Tool Button is depressed, the mouse
pointer adds the word "atom" to the pointer when the pointer is
located within the Drawing Area ... The selected atom is shown in the small
entry box next to the button ... To change the atom in the entry box, click in
the entry box and enter the atom desired (or use the Periodic Table Button).
 Periodic Table Button - displays
the Periodic Table ... Select an atom from the table for entry into the
Selected Atom entry box described above.
Periodic Table Button - displays
the Periodic Table ... Select an atom from the table for entry into the
Selected Atom entry box described above.
 Plus and Minus Buttons -
for designating and depicting charges on atoms in the Drawing Area.
Plus and Minus Buttons -
for designating and depicting charges on atoms in the Drawing Area.
 Move Button (also Ctrl+M key combo)
- depressing the Move Button changes the mouse pointer to double-headed arrows.
Move Button (also Ctrl+M key combo)
- depressing the Move Button changes the mouse pointer to double-headed arrows.
(1) To Move the entire structure in the Drawing Area, click & hold the left mouse down outside of the structure and drag the structure to a new position.
(2) To Move an atom, click & hold the left mouse down on the specific atom and drag to a new position.
 Select / Move / Rotate / Zoom Tool Button - when the button is depressed on the Main Menu Bar, the mouse pointer
remains or changes to a hand with a pointing index finger ... The mouse
pointer hand with a pointing index finger is the Drawing Module default, but
changes for various functions.
Select / Move / Rotate / Zoom Tool Button - when the button is depressed on the Main Menu Bar, the mouse pointer
remains or changes to a hand with a pointing index finger ... The mouse
pointer hand with a pointing index finger is the Drawing Module default, but
changes for various functions.
To use in the Drawing Area, select the atom or area of the structure and press the right mouse button to activate.
The Rotate and Zoom features require pressing
the Shift Key or Control Key as noted.
 Eraser Tool Button - depressing
the Eraser Tool Button changes the mouse pointer to scissors ... Press
the left mouse button (and hold) and drag over the atoms and bonds of the
structure to be deleted.
Eraser Tool Button - depressing
the Eraser Tool Button changes the mouse pointer to scissors ... Press
the left mouse button (and hold) and drag over the atoms and bonds of the
structure to be deleted.
 Benzene Ring Button (also
Shift+Ctrl+B key combo) - depressing this button allows a benzene ring to be
added to the Drawing Area.
Benzene Ring Button (also
Shift+Ctrl+B key combo) - depressing this button allows a benzene ring to be
added to the Drawing Area.
SMILES Line
SMILES Line in the Drawing Module ... an empty (blank) SMILES Line is depicted here (Figure 17):

Figure 17. SMILES Line
If the SMILES notation of the current chemical (e.g phenol) is entered in an SMILES line, then the Drawing Module will depict the structure as shown on Figure 18:

Figure18. Depiction of entered SMILES on the Drawing panel
Both the SMILES Notation and Structure are shown in the Drawing Module.
(1) Manually changing the SMILES in the SMILES Line changes the Structure depiction to match.
(2) Changing the Structure with the drawing tools changes the SMILES in the SMILES Line.
Invalid SMILES (Bad SMILES)
The Drawing will not depict an invalid or bad SMILES notation (such as incomplete ring). When an invalid SMILES is detected by the Drawing Module, the SMILES Line changes from the light-blue color shown above to a red-background color shown here (Figure 19):

Figure 19. SMILES line with invalid SMILES notation
The SMILES Line can also be used to directly enter a SMILES or modify the existing SMILES ... For example, if the SMILES notation for phenol is manually entered into the SMILES Line, the structure will be depicted (Figure 20):

Figure 20
Templates
The default Template Region of the Drawing Module appears as (Figure 21):

Figure 21. Template region
The Template
Symbols at top (  ), left to right, refer
to the following functions:
), left to right, refer
to the following functions:
(1) Benzene Symbol - Fixed Templates
(2)  Symbol - Load User
Templates
Symbol - Load User
Templates
(3) Diskette Symbol - Save Templates as SMI file
The Template Region contains pre-assigned structures that can be entered into the Drawing Area by clicking a Template structure (the background turns blue) and then moving the mouse pointer to the Drawing Area and clicking to insert that structure.
Load User Templates
Pressing the  Symbol calls a file selection directory that lists files with a
".SMI" file extension. User Templates are stored in plain text
files having the ".SMI" file extension. These text files
contain one SMILE notation per line ... Each SMILES represents one structure in
a Template ... For example, if a file named "UserFile.smi" contains
the following lines of SMILES:
Symbol calls a file selection directory that lists files with a
".SMI" file extension. User Templates are stored in plain text
files having the ".SMI" file extension. These text files
contain one SMILE notation per line ... Each SMILES represents one structure in
a Template ... For example, if a file named "UserFile.smi" contains
the following lines of SMILES:
c12c(cccc1)CCC2
c12c(cccc1)cccc2
NC1=NC=NC2=C1N=CN2[C@@]3([H])[C@@]([H])([H])[C@@](O)([H])[C@](CO)([H])O3
OC(C(O)(C([H])(C([H])(CO)O)O)[H])(C=O)[H]
... and the file is opened with the Load User Template function, the Template Region will change to (Figure 22):

Figure 22. View of loaded user defined template forms
Selecting the Deoxyribonucleoside base (Adenine) (blue background) and clicking in the Drawing Area inserts the structure as shown.
Clicking back to the Benzene Symbol reloads the original Template.
Creating a User Template SMI File:
An easy method for creating a User Template file is to use a text editor (such as Notepad that comes with Windows) and insert the SMILES for the structures required (one SMILES per line) and save the file with an SMI file extension (or save it as a ".txt" file (Notepad's default) and rename it with ".smi".
Tips for Drawing
Creating Fused Ring Structures (Figure 23)

Figure 23. Creating Fused Ring Structures
A quick method for creating fused-ring structures (such as naphthalene, anthracene, phenanthrene, etc) is the following:
(1) From the default Template Region, left-mouse button click the Benzene template and then insert it into the Drawing Area by clicking the left-mouse button once.
(2) Go back to the Template Region and click the Benzene template again. Go the Drawing Area (away from the existing Benzene ring), press the left-mouse button and hold it down. Moving the mouse (with the left-mouse button held down) will display another Benzene ring. With the left-mouse-button still held-down, drag the Benzene ring to the first Benzene ring and join the sides as shown on Figure 23.
(3) Release the left-mouse button to complete the fused rings
(4) Repeat if additional rings need to be fused.
4. Entering a chemical from database
To select the target chemical from an existing database, the user should press the button Select from Database (1). A list containing the available databases will appear. The user will need to select the database (2) from which the target will be chosen and then to confirm the selection via the button OK (3). (Figure 24)

Figure 24
Subsequently a window representing all chemicals from the selected database will appear. The user needs to select the chemical intended to be the target (4) and to confirm the selection via the button OK (5). (Figure 25)

Figure 25
5. Entering a chemical from inventory list
The user can select the target chemical from a list of inventories including Canadian DSL, EC EINECS, Japan CSCL, OECD HPV Chemicals List, US EPA HPV Chemicals List, US EPA TSCA.
To do so, the user should press the button Select from Inventory (1). A list containing available inventories will appear. The user will need to select the inventory (2) from which the target will be chosen and then to confirm the selection via the button OK (3). (Figure 26)

Figure 26
Subsequently a window representing all chemicals from the selected inventory will appear. The user needs to select the chemical intended to be the target (4) and to confirm the selection via the button OK (5). (Figure 27)

Figure 27
6. Entering a chemical from file
The target chemical can be selected from a list of already specified atom connectivity stored in a file. Currently supported by the system atom connectivity file formats are SDF, MOL, MOL2, RDF and XYZ. A text files (*.txt) could be used if each row in the file contains InChi or SMILES string. Files with SMILES may contain TAB delimited CAS number and chemical name followed by the corresponding SMILES string. Usually the extension of these files is *.smi instead of *.txt.
The user should press the button Select from File (1), select the pathway (2), file format (3), and the name of the file (4). (Figure 28)

Figure 28
Subsequently a window representing all chemicals from the selected file will appear. The user needs to select the chemical intended to be the target (5) and to confirm the selection via the OK button (6). (Figure 29)

Figure 29
II. List of chemicals
Instead of entering a single chemical the user can load a list of chemicals on the data matrix, explore their chemical and toxicological properties, reactivity potencies for various endpoints, etc. and then select a target to fill its data gaps.
A chemical list could be loaded from:
o a database
o an inventory list
o a custom file
The selected chemicals are then added to the data matrix and are available for further analysis. (Figure 30)

Figure 30
1. Loading a database
The chemicals from an existing database could be loaded in two ways:
· Load discrete chemicals from existing database
To load an existing database, the user should press the button Load Database (1). A list containing the available databases will appear. The user will need to select the database (2) and then to confirm the selection via the button OK (3). (Figure 31)

Figure 31
· Load tautomeric set of chemicals from existing database
To load the tautomeric set of chemicals from an existing database, the user should press the button Load Database (1). A list containing the available databases will appear. The user will need to select the database (2), then to select Tautomeric set (3) and to confirm the selection via the button OK (4). (Figure 32)
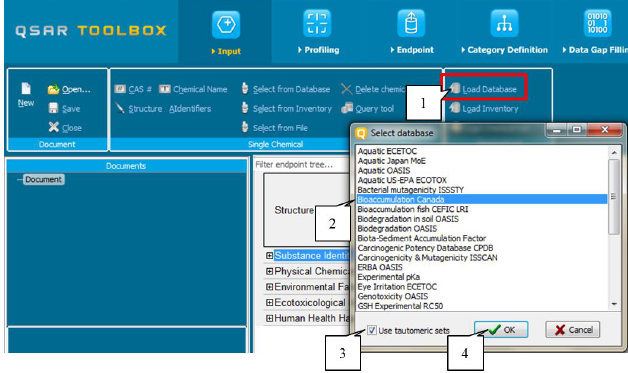
Figure 32
Then the tautomeric set of chemicals from the selected database appeared on data matrix (1). The label indicating the number of generated tautomers is located at the top left corner of each chemical structure (2). (Figure 33)

Figure 33
2. Loading an inventory list
To load an existing inventory the user should press the button Load Inventory button (1). A list containing available inventories will appear. The user will need to select the inventory (2) from which the target will be chosen and then to confirm the selection via the OK button (3). (Figure 34)

Figure 34
3. Load a custom file
A set of chemicals could be loaded via a list with specified atom connectivities stored in a file. Currently supported by the system atom connectivity file formats are SDF, MOL, MOL2, RDF and XYZ. A text files (*.txt) could be used if each row in the file contains InChi or SMILES string. Files with SMILES may contain TAB delimited CAS number and chemical name followed by the corresponding SMILES string. Usually the extension of these files is *.smi instead of *.txt.
The user should press the button Load Chemicals List (1), select the pathway (2), file format (3), and the name of the file (4). (Figure 35)

Figure 35
III. Chemical IDs
The main chemical identifiers are:
- CAS - there is validation for CAS number
- 2D structures represented by SMILES:
Ø SMILES are presented in OASIS SMILES format
- Chemical names:
Ø multiple chemical names for one CAS-SMILES combination
Ø Toolbox cannot discriminate and generate IUPAC names
The Chemical IDs button is available under Input section (Figure 36)

Figure 36
The Toolbox is designed to hold unlimited number of chemical ID`s
Ø as number based (EC (EINECS number), MITI number)
Ø as string based (InCHi code, Molecular formula)
The chemical identifies could be searched across databases and inventories. The custom chemical identifies could be added during an import process (Figure 37):

Figure 37
Once the Chemical identifies are added to the custom database the user could search the current database by the available chemical identifiers. Select the desired type chemical identifiers (1), enter the number (2) of the searched IDs. Then click Search (3) and finally OK (5) button. The chemical identifiers could be searched in tautomeric set of chemicals (4). (Figure 38)

Figure 38
IV. Query tool
The Query tool is accessible on the Toolbox input panel: (Figure 39)

Figure 39
The Query search is possible across discrete chemicals or in tautomeric set of chemicals: (Figure 40)

Figure 40
The Query tool main components are (Figure 41):
• Query edit panel (1)
• Query tree logic panel (2)

Figure 41
The Query edit panel includes two basic components:
Ø search group panel (1)
Ø available searches for selected group (2) (Figure 42)

Figure 42
1.Chemical identifiers
The available queries for the Chemical identifiers panel are:
Ø search by CAS:
o single(1)
o list with CAS numbers (2) and
o CAS range (3): (Figure 43)

Figure 43
Ø Search by names – search single (1) or list with names (2) (Figure 44)

Figure 44
Ø Search by molecular (bruto) formula: it is possible to search by exact match or containing options (1). Also a single chemical or list with chemicals (2) could be searched. (Figure 45)

Figure 45
Ø Search by tautomercount: it is possible to search discrete chemicals or tautomeric set with different numbers of tautomers. Different qualifiers could be used to define the searched query. (Figure 46)

Figure 46
2.Data panel
In panel Data the user could specify the: endpoint (1); the predefined path (2) to which the data will be searched on; metadata information (3); descriptors (numerical data) (4); duration (5) and experimental value (6) (Figure 47)

Figure 47
3.Parameters panel
The third panel Parameters provides the user possibility to search databases by 2D or 3D parameters. The qualifiers are available in order to set different options for searching. (Figure 48)

Figure 48
4.SubFragmet panel
The fourth panel SubFragments allows to search chemical structure, which can be drawn (paste SMILES) by using Edit (1) button. It is possible to search Exact match structure or Allow internal connection (2) bonds attached to the target structure. (Figure 49)

Figure 49
5.Category panel
The Category panel allows searching by any of the available profiling method (1). Select the desired category(s) from the panel (2) and move it to the panel (3). Different options of searching are possible (4). (Figure 50)

Figure 50
5.Similarity panel
The last panel Similarity allows searching chemicals similar to the target structure with respect to different similarity options. The target structure could be added to 2D panel using Edit button (1), the similarity options are visualized in the panel Options (2). (Figure 51)

Figure 51
When the queries (s) of the current search are ready the user should add them to the Query tree logic panel (2) and execute them by double clicking the query (2). The queries could be combined together with logical AND; OR or the user could negate the query by logical NOT (3). (Figure 52)

Figure 52